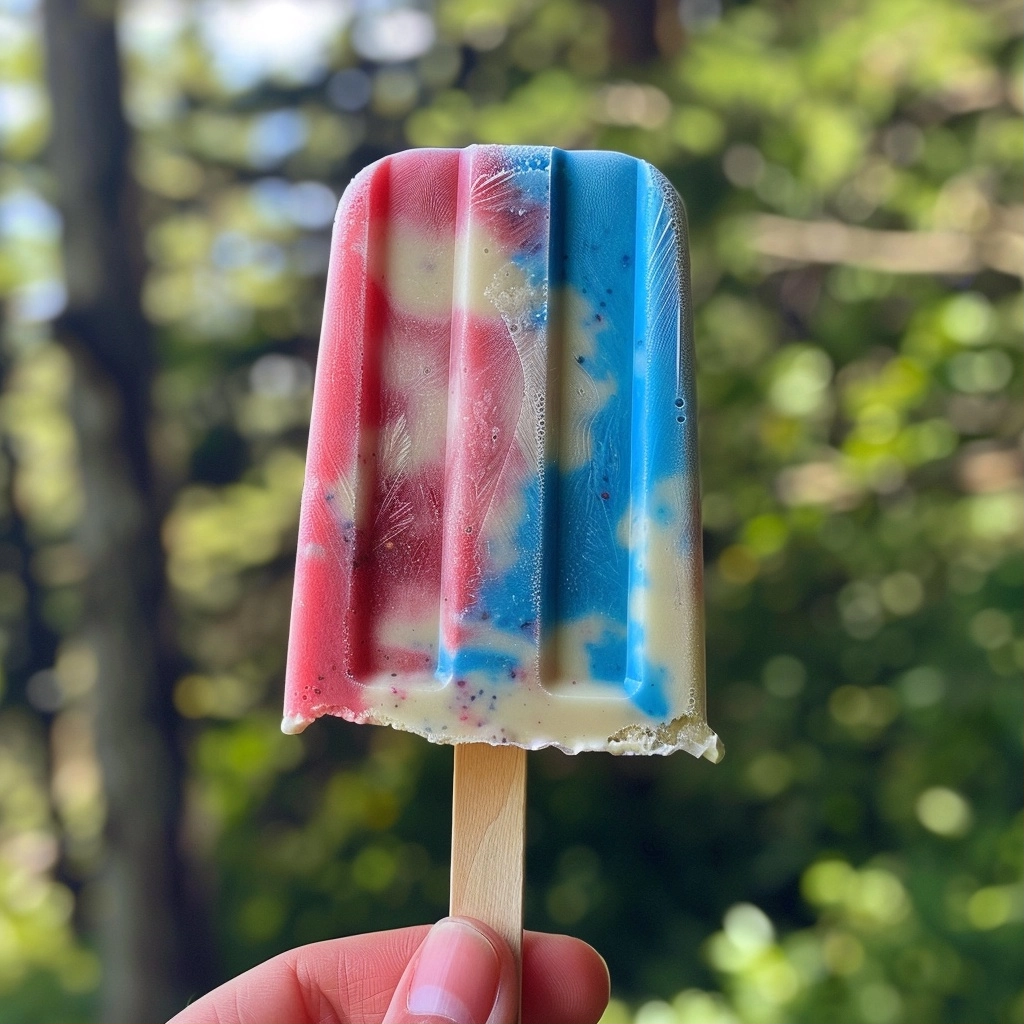
Red White and Blue Popsicles are delightful frozen desserts showcasing vibrant colors and creamy white chocolate pudding layers. This recipe merges instant pudding’s smooth texture with festive red and blue hues, perfect for summer celebrations or patriotic holidays.
| Prep Time | 10 minutes |
|---|---|
| Cook Time | 0 minutes |
| Total Time | 4 hours 10 minutes |
| Servings | 8 popsicles |
| Difficulty | Easy |
| Cuisine | American |
Why This Recipe Works
This Red White and Blue Popsicles recipe works because it uses instant white chocolate pudding, which offers a luxuriously creamy base that freezes smoothly. Unlike typical fruit juice popsicles, these have a richer texture that stays enjoyable even when frozen solid.
I find that dividing the pudding into three parts and coloring two layers creates a visually striking red, white, and blue design that looks festive and inviting. The use of zip-top bags for filling the mold makes the process neat and controlled, preventing colors from mixing unintentionally.
The technique requires no cooking or complicated preparation, making it accessible yet impressive, ideal for family gatherings or patriotic holidays like the Fourth of July.
Ingredients
| Ingredient | Quantity | Notes with alternatives |
|---|---|---|
| White chocolate instant pudding | 9.9 ounces | Standard instant pudding mix; substitute with vanilla pudding for less chocolate flavor |
| Milk | 5 cups | Whole milk preferred for creaminess; use almond or oat milk for dairy-free option |
| Red food coloring | as needed | Gel or liquid food coloring |
| Blue food coloring | as needed | Gel or liquid food coloring |
Step-by-Step Instructions
Prepare the Pudding Base
- Combine the white chocolate instant pudding powder with the milk in a large mixing bowl.
- Whisk thoroughly until the pudding powder is fully dissolved and the mixture has thickened slightly.
Color the Pudding
- Divide the pudding mixture equally into three separate bowls.
- Add red food coloring to one bowl and mix well.
- Add blue food coloring to the second bowl and stir thoroughly.
- Leave the third bowl uncolored as the white pudding layer.
Fill the Popsicle Molds
- Place a zip-top bag inside a tall glass, open it wide, and spoon in the red pudding mixture; seal the bag.
- Repeat this process for the blue and white pudding mixtures, each in separate zip-top bags.
- Snip a small corner off the red bag to create a nozzle for dispensing.
- Fill each popsicle mold section about one-third full with the red pudding layer.
- Repeat with the white pudding and then the blue pudding to fill the molds fully in three distinct layers.
- Seal the popsicle mold with its lid if available and insert popsicle sticks into each slot.
Freeze and Serve
- Place the mold on a flat surface like a baking sheet for stability and transfer it to the freezer.
- Freeze for at least 4 hours or preferably overnight until completely solid.
- Remove the popsicles carefully from the molds before serving.
Chef Tips for Perfect Results
- Use whole milk for the creamiest texture; lower-fat milk leads to icier results.
- Whisk the pudding mixture vigorously to prevent lumps and ensure even blending.
- Use gel food coloring for more vibrant hues without adding too much liquid.
- Freezing the popsicles on a baking sheet keeps them level for uniform layers.
- Snip small holes in the bags carefully to control the flow when filling molds and avoid color mixing.
- Allow popsicles to thaw slightly for 2-3 minutes before unmolding to prevent cracking.
Common Mistakes to Avoid
- Overfilling molds may cause mixture overflow and uneven layering; fill carefully in thirds per instructions.
- Not whisking pudding enough can cause grainy texture; whisk until completely smooth.
- Using low-fat milk can freeze too hard and lose creaminess; opt for whole or full-fat milk.
- Introducing color too early can stain utensils; use separate spoons for mixing each color.
- Removing popsicles too soon from the freezer leads to melty texture; freeze fully for best results.
Variations and Substitutions
| Ingredient | Substitution | Impact on Flavor |
|---|---|---|
| White chocolate instant pudding | Vanilla instant pudding | Milder flavor, less chocolaty but still creamy |
| Milk (whole) | Almond or oat milk | Slightly nutty or sweet taste, reduces creaminess |
| Red and blue food coloring | Natural coloring (beet juice, blueberry juice) | Subtle hues with mild flavor changes, more natural |
Serving Suggestions and Pairings
These Red White and Blue Popsicles serve beautifully at summer barbecues, Independence Day picnics, or patriotic fundraising events. Pair them with classic American desserts like apple pie, berry salad, or a light lemon sorbet.
They also work as refreshing palate cleansers between spicy foods or smoky grilled dishes. Serve with crisp iced tea or lemonade for a complete summer refreshment experience.
Storage and Reheating
| Method | Duration | Instructions |
|---|---|---|
| Freezer | Up to 2 weeks | Keep popsicles in the mold or wrapped individually in plastic wrap to avoid freezer burn. |
| Thawing | 2-3 minutes | Let sit at room temperature briefly before unmolding for best texture. |
Nutritional Information
| Nutrient | Amount per Serving |
|---|---|
| Calories | 150 kcal (Approximate values) |
| Protein | 4 g |
| Fat | 4 g |
| Carbohydrates | 25 g |
| Fiber | 0 g |
| Sugar | 20 g |
| Sodium | 180 mg |
Frequently Asked Questions
Can I substitute the white chocolate pudding with vanilla pudding?
Yes, using vanilla pudding instead of white chocolate will yield a milder and less chocolaty taste while maintaining creamy texture. This substitution works well if you prefer a subtler flavor that pairs nicely with colored layers.
How do I know when the popsicles are fully frozen?
Red White and Blue Popsicles are fully frozen after at least 4 hours in the freezer, preferably overnight. The popsicles will feel solid to the touch and should release cleanly from the mold without melting or sticking.
What should I do if the colors start mixing during molding?
Prevent color mixing by filling each pudding layer slowly and allowing brief resting time between layers to set slightly. Using snipped zip bags carefully to control flow also reduces spillage and blending of colors.
Can I make these popsicles ahead of time for a party?
Yes, these popsicles can be prepared a day or two in advance and stored in the freezer wrapped or in their mold. This makes them convenient for party prep and ensures they are ready to serve when needed.
What are some serving ideas for Red White and Blue Popsicles?
These popsicles pair wonderfully with summer side dishes like coleslaw, fruit salad, and grilled vegetables. They also complement soft desserts such as angel food cake or fresh berries during patriotic celebrations.
For more creative frozen treats, see our fruit popsicle recipes and Food Network’s dessert ideas.
Explore classic American dessert inspiration at AllRecipes.

Red White and Blue Popsicles
Ingredients
- White chocolate instant pudding
- 5 cups milk
- Red food coloring
- Blue food coloring
Instructions
- Combine the white chocolate instant pudding powder with the milk in a large mixing bowl.
- Whisk thoroughly until the pudding powder is fully dissolved and the mixture has thickened slightly.
- Divide the pudding mixture equally into three separate bowls.
- Add red food coloring to one bowl and mix well.
- Add blue food coloring to the second bowl and stir thoroughly.
- Leave the third bowl uncolored as the white pudding layer.
- Place a zip-top bag inside a tall glass, open it wide, and spoon in the red pudding mixture; seal the bag.
- Repeat this process for the blue and white pudding mixtures, each in separate zip-top bags.
- Snip a small corner off the red bag to create a nozzle for dispensing into a popsicle mold.
- Fill the bottom third of the mold with red pudding.
- Repeat with the white pudding, followed by the blue pudding.
- Insert the popsicle sticks and freeze until fully solid, about 4 hours.