
Introduction
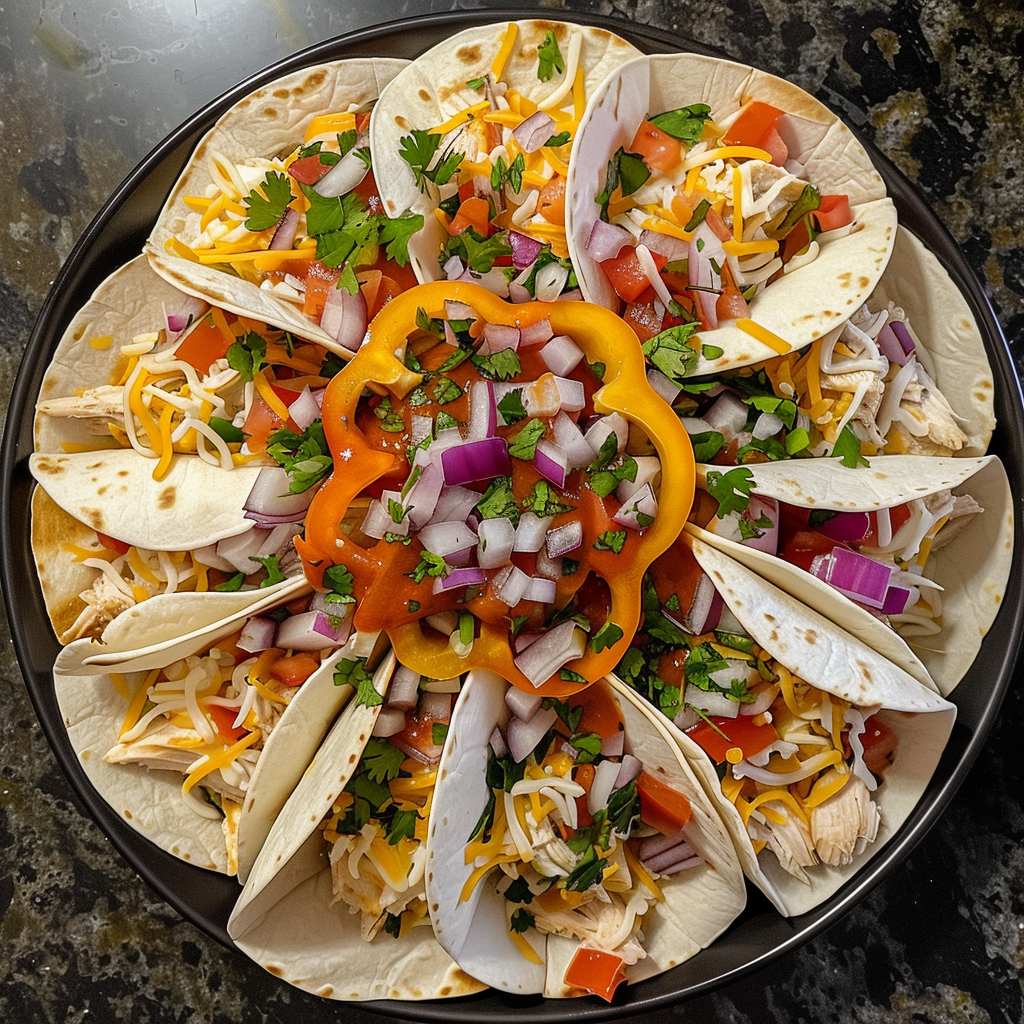
If you’re looking to impress your family or guests with a vibrant, flavorful, and fun-to-eat dish, the Blooming Quesadilla Ring is your new go-to recipe. This festive and aromatic creation combines the melty goodness of Colby, Monterey Jack, and cheddar cheeses with tender, shredded chicken and fresh vegetables wrapped inside soft flour tortilla halves. The ring shape not only looks inviting but offers a crispy, cheesy texture on the outside while remaining satisfyingly soft and savory on the inside. Each bite bursts with the comforting warmth of seasoned chicken and the tangy zest of salsa and taco sauce, making it a perfect dish for game days, parties, or a cozy family dinner.
Prep Time, Cook Time, and Servings
This recipe requires approximately 25 minutes of prep time and 20 minutes of cooking time, resulting in a total of about 45 minutes. The Blooming Quesadilla Ring serves around 6 to 8 people, making it ideal for sharing with friends or family.
Ingredients
- 20 soft flour tortilla taco shells
- 3 cups cooked skinless, boneless chicken breast, shredded (about 3 chicken breasts)
- 1 yellow bell pepper, seeded and diced
- ½ cup sweet yellow onion, finely diced
- ½ cup red onion, finely diced
- ½ cup salsa, your favorite brand
- 1 cup taco sauce, your favorite brand
- 4 cups Colby and Monterey Jack cheese, finely shredded
- 2 cups cheddar cheese, finely shredded
- 2 tablespoons fresh cilantro, chopped (optional garnish)
Step-by-Step Instructions
- Preheat the oven: Set your oven to 375°F (190°C). Line a baking sheet with parchment paper to prevent sticking and easy cleanup.
- Prepare the ring form: Place a large, wide-mouth glass jar in the center of the parchment-lined baking sheet. This will be used to shape the quesadilla ring.
- Cut the tortillas: Using a sharp knife or a pizza cutter on a cutting board, slice each tortilla in half. Immediately cover the halved tortillas with a clean, dry cloth to keep them soft and pliable.
- Mix the filling: In a large mixing bowl, combine the shredded chicken, diced yellow bell pepper, finely diced yellow onion, finely diced red onion, salsa, and taco sauce. Stir everything together until evenly incorporated.
- Fill and roll the tortillas: Spoon about 1½ tablespoons of the chicken mixture onto each tortilla half, then top with 1½ tablespoons of the shredded Colby and Monterey Jack cheese blend. Carefully roll each tortilla into a cone shape, taking care not to squeeze out the filling. The pointed ends of the cones should face inward, positioned around the wide-mouth glass jar to form a ring.
- Form the first layer: Arrange about 12 to 13 filled cones closely together with their pointed ends touching the jar in the center, creating the bottom layer.
- Add cheddar cheese: Sprinkle 1 cup of shredded cheddar cheese evenly over the bottom ring of cones.
- Create the second and third layers: Repeat the cone-making process, placing a second ring of cones on top of the first, followed by another cup of cheddar cheese. Finally, add the third ring of cones and sprinkle the last cup of cheddar cheese evenly over the top.
- Remove the jar: Gently lift out the glass jar from the center of the ring, leaving a hollow middle to cook evenly.
- Bake the ring: Place the baking sheet in the preheated oven and bake for 15 to 20 minutes, or until the edges of the cones are golden brown and the cheese has melted beautifully.
- Serve: Using the edges of the parchment paper, carefully transfer the quesadilla ring onto a heat-safe serving plate. Garnish with chopped fresh cilantro if desired. Serve immediately with extra salsa or your favorite dipping sauce.
Pro Tips for Perfect Results
- Keep tortillas covered: Always cover your cut tortillas with a towel while preparing to keep them soft and easy to roll.
- Don’t overfill cones: Use the recommended amount of filling to prevent spills and to maintain the cone shape.
- Sharp knife or pizza cutter: Cutting tortillas cleanly helps prevent tearing or uneven edges.
- Oven temperature: Be sure your oven is fully preheated to 375°F for even baking and crispy edges.
- Cheese choice: Use freshly shredded cheese rather than pre-shredded for better melting and flavor.
Variations and Substitutions
- Protein swaps: Substitute chicken with cooked ground turkey or seasoned tofu for a vegetarian twist.
- Cheese substitutions: Try pepper jack for extra spice or mozzarella for a milder, stretchier texture.
- Healthier tweaks: Use whole wheat or low-carb tortillas to add fiber; swap taco sauce with salsa verde for a fresher taste.
- Extra veggies: Add diced zucchini, corn kernels, or black beans for additional texture and nutrients.
- Make it dairy-free: Use vegan cheese alternatives and check that your sauces are dairy-free.
Storage and Reheating Tips
Store any leftovers in an airtight container in the refrigerator for up to 3 days. To keep the quesadilla ring crispy when reheating, uncover and warm in a preheated oven at 350°F (175°C) for about 10 minutes or until heated through and crisp. Avoid microwaving as this can make the tortillas soggy.
Frequently Asked Questions (FAQs)
- Can I make the Blooming Quesadilla Ring ahead of time?
- Yes, you can assemble the ring a few hours in advance, cover with plastic wrap, and refrigerate. Bake it just before serving to ensure it stays crisp and fresh.
- Is it possible to freeze the quesadilla cones?
- Yes, you can freeze the assembled but unbaked cones. Place them on a baking sheet until frozen solid, then transfer to a freezer-safe container. Bake them from frozen, adding extra baking time as needed.
- What dipping sauces pair well with this quesadilla ring?
- Try classic salsa, guacamole, sour cream, or even a creamy cilantro lime dressing for added flavor.
- Can I use corn tortillas instead of flour tortillas?
- While corn tortillas have great flavor, they are less flexible and prone to breaking. Flour tortillas are better for rolling and crisping in this recipe.
- How spicy is the Blooming Quesadilla Ring?
- Spice level depends on the salsa and taco sauce used. Opt for mild versions if you prefer less heat, or choose spicy brands for a kick.
Nutrition Estimate Per Serving
Each serving of the Blooming Quesadilla Ring provides approximately 420 calories, 35 grams of protein, 30 grams of carbohydrates, and 18 grams of fat. The lean chicken breast supplies a generous amount of protein, while the cheeses add richness and calcium. The use of fresh vegetables boosts the vitamin content, making this dish both satisfying and balanced.
Blooming Quesadilla Ring
A vibrant, cheese-filled ring made with soft tortillas, seasoned chicken, vegetables, and tangy taco flavors. Perfect for sharing with friends or family.
- 20 soft flour tortilla taco shells
- 3 cups cooked skinless, boneless chicken breast, shredded
- 1 yellow bell pepper, seeded and diced
- ½ cup sweet yellow onion, finely diced
- ½ cup red onion, finely diced
- ½ cup salsa
- 1 cup taco sauce
- 4 cups Colby and Monterey Jack cheese, finely shredded
- 2 cups cheddar cheese, finely shredded
- 2 tablespoons fresh cilantro, chopped (optional)
-
Preheat oven to 375°F (190°C). Line a baking sheet with parchment paper.
-
Place a large glass jar in the center of the prepared baking sheet to use as a ring mold.
-
Cut each tortilla in half and cover with a dry cloth to keep pliable.
-
In a bowl, combine chicken, yellow bell pepper, onions, salsa, taco sauce, and 2 cups of the mixed cheeses.
-
Spoon chicken mixture onto each tortilla half, top with 1½ tablespoons of cheese, then roll into cones. Position cones around the jar with pointed ends inward.
-
继续排至第一层用12-13个锥形,中间填充剩余奶酪和鸡肉混合物,形成环状。
-
Repeat with remaining tortillas and filling for the second layer.
-
Press outer tortilla halves flat to bake evenly.
-
Bake for 18-20 minutes until golden and crisp. Cool slightly, then remove the jar.
-
Garnish with cilantro before serving.
Use a wide, heat-resistant wrap for easier removal.
Substitute the glass jar with a ring mold if available.
Ensure tortillas remain pliable by covering during assembly.