
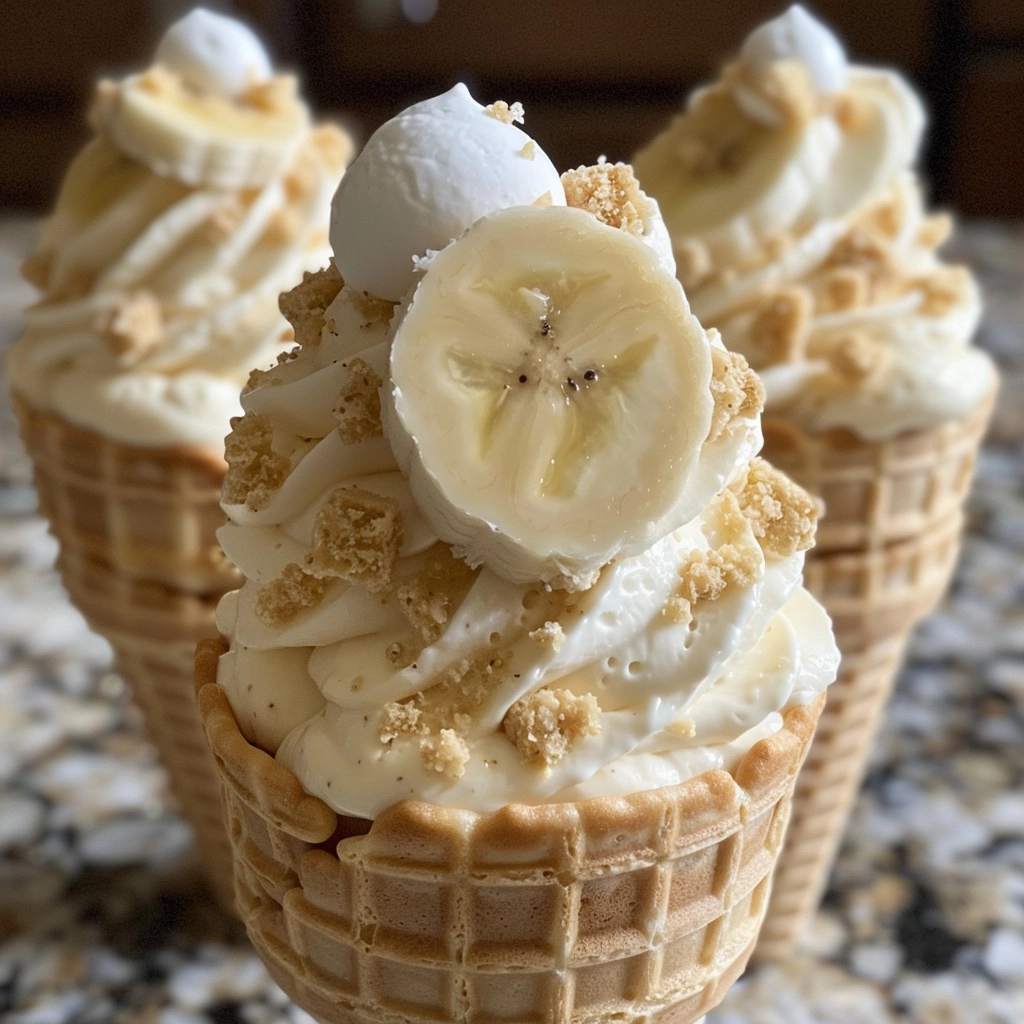
Discover the Delight of Banana Pudding Cheesecake Cones
If you’re a fan of rich, creamy desserts that combine classic flavors with a fun twist, you’re going to love these Banana Pudding Cheesecake Cones. Imagine the dreamy blend of smooth cream cheese, the sweet freshness of ripe bananas, and the nostalgic crunch of vanilla wafer crumbs—all wrapped inside a crispy waffle cone. This treat boasts a delightful balance of textures from the velvety cheesecake filling to the crunchy cone and wafer topping. The aroma of vanilla and bananas will fill your kitchen, making it almost impossible to wait until serving time. Whether for a party, a family treat, or a sunny afternoon indulgence, these cones offer a whimsical yet elegant way to enjoy a beloved dessert in a handheld form.
Prep time and organization are key to perfecting this recipe. This Banana Pudding Cheesecake Cones recipe requires about 15 minutes of prep time, 30 minutes of refrigeration to set the filling, and since it’s a no-bake dessert, there’s no cook time needed. In total, you’ll spend roughly 45 minutes from start to finish. This recipe yields 12 servings, making it perfect for gatherings or to enjoy over several days.
Ingredients You’ll Need
- 8 ounces cream cheese, softened
- 1 cup granulated sugar
- 1 teaspoon vanilla extract
- 1 cup sour cream
- 1 cup heavy cream
- 1/2 cup banana puree (about 2 ripe bananas)
- 1/2 cup crushed vanilla wafers
- 12 waffle cones
- 2 bananas, sliced
- Whipped cream for garnish
- Additional crushed vanilla wafers for garnish
Step-by-Step Instructions
- Beat the cream cheese. In a large mixing bowl, use an electric mixer to beat the softened cream cheese until it’s completely smooth and creamy. This is the base of your decadent filling, so take your time to get it lump-free.
- Add sugar and vanilla. Add the granulated sugar and vanilla extract to the cream cheese. Continue beating the mixture until fully combined and slightly fluffy to incorporate air for lightness.
- Mix in sour cream and heavy cream. Pour in the sour cream and heavy cream. Beat the mixture at medium speed until it becomes light, fluffy, and airy, roughly 2-3 minutes.
- Fold in banana puree and crushed wafers. Gently fold the banana puree and crushed vanilla wafers into the creamy mixture with a spatula. Make sure everything is evenly incorporated without deflating the filling.
- Refrigerate. Cover the bowl and refrigerate the cheesecake mixture for about 30 minutes to help it set and firm up for easier filling.
- Fill the cones. Once chilled, spoon or pipe the cheesecake mixture into the waffle cones, filling each generously but carefully to avoid breaking the cones.
- Add toppings. Top each cone with sliced bananas, a dollop of whipped cream, and sprinkle extra crushed vanilla wafers on top for a perfect crunch and extra flavor.
- Serve and enjoy. Serve immediately to enjoy the contrast of creamy filling and crunchy cone. The combination will delight every bite!
Pro Tips for Perfect Banana Pudding Cheesecake Cones
- Make sure the cream cheese is fully softened to avoid lumps in your filling.
- Use ripe bananas for the puree to maximize natural sweetness and banana flavor.
- Chill the filling enough so it holds shape but remains soft enough to pipe easily.
- Crush the vanilla wafers finely but leave some crumbs larger for texture variation.
- Fill the cones right before serving to keep the waffle cones crisp and avoid sogginess.
Variations and Substitutions
Want to tweak these Banana Pudding Cheesecake Cones? Here are some ideas:
- Healthier option: Substitute sour cream with Greek yogurt for a protein boost and lighter tang. Use reduced-fat cream cheese and lighter whipped cream to cut fat.
- Flavor twists: Add a teaspoon of cinnamon or nutmeg to the filling for a warm spice note. Lemon zest can add a fresh brightness that complements the bananas well.
- Alternative cones: If you prefer, you can use gluten-free or sugar-free cones to accommodate dietary needs.
- Fruit additions: Mix in finely diced strawberries or blueberries with the banana puree to give your cones a colorful burst of flavor.
Storage and Reheating Tips
Because these cones are filled with a delicate cheesecake mixture, it’s best to enjoy them fresh. However, you can prepare the filling in advance and store it covered in the refrigerator for up to 2 days. The waffle cones should be kept in an airtight container separately to maintain crispness. Avoid refrigerating pre-filled cones as they may become soggy. If needed, assemble just before serving. Reheating is not recommended, as it will alter the creamy texture and crisp cone.
Frequently Asked Questions
- Can I make the banana puree ahead of time? Yes, you can make it a day in advance. Store it tightly wrapped in the fridge to prevent browning, or add a few drops of lemon juice to the puree to preserve freshness.
- Can I use frozen bananas for the puree? Absolutely. Let frozen bananas thaw fully and drain excess moisture before pureeing to avoid watery filling.
- Are waffle cones necessary? You can use sugar cones or even small cups if preferred, but waffle cones add a perfect crunch and complement the creamy filling well.
- How do I avoid the cones getting soggy? Fill the cones last minute and serve immediately. Storing pre-filled cones in the fridge will soften the cones.
- Can I make this dessert vegan? This recipe relies on dairy ingredients, but you can substitute vegan cream cheese, coconut cream instead of heavy cream, and plant-based sour cream for a vegan friendly version.
Nutrition Estimate Per Serving
Each Banana Pudding Cheesecake Cone contains roughly 320 calories with about 4 grams of protein, 35 grams of carbohydrates, and 18 grams of fat. This makes it a moderately indulgent treat with good balance of creamy fats and natural sugars from banana and wafers. Adjust portion sizes or ingredient substitutions to fit your dietary needs.
Ready to impress your family and guests with an easy yet sophisticated dessert? These Banana Pudding Cheesecake Cones bring flavor, fun, and freshness together effortlessly. Enjoy the creamy filling, crisp waffle cone, and nostalgic vanilla banana flavor in every delightful bite!
Banana Pudding Cheesecake Cones

A handheld fusion of classic banana pudding and cheesecake. Rich cheesecake filling with banana and vanilla wafer crumbs is layered into crispy waffle cones for a dreamy, indulgent treat.
- 8 ounces cream cheese, softened
- 1 cup granulated sugar
- 1 teaspoon vanilla extract
- 1 cup sour cream
- 1 cup heavy cream
- 1/2 cup banana puree (about 2 ripe bananas)
- 1/2 cup crushed vanilla wafers
- 12 waffle cones
- 2 bananas, sliced
- Whipped cream for garnish
- Additional crushed vanilla wafers for garnish
-
Beat the cream cheese until smooth and creamy
-
Add sugar and vanilla extract; beat until fluffy
-
Mix in sour cream and heavy cream until light and airy
-
Fold in banana puree and crushed vanilla wafers
-
Refrigerate for 30 minutes to firm up
-
Spoon or pipe the mixture into waffle cones
-
Top with sliced bananas, whipped cream, and crushed wafers
Ensure cream cheese is softened for easy mixing
Chill filling before assembling to improve texture
Store assembled cones in sealed container in refrigerator for up to 24 hours