Introduction to TacoCupcakes
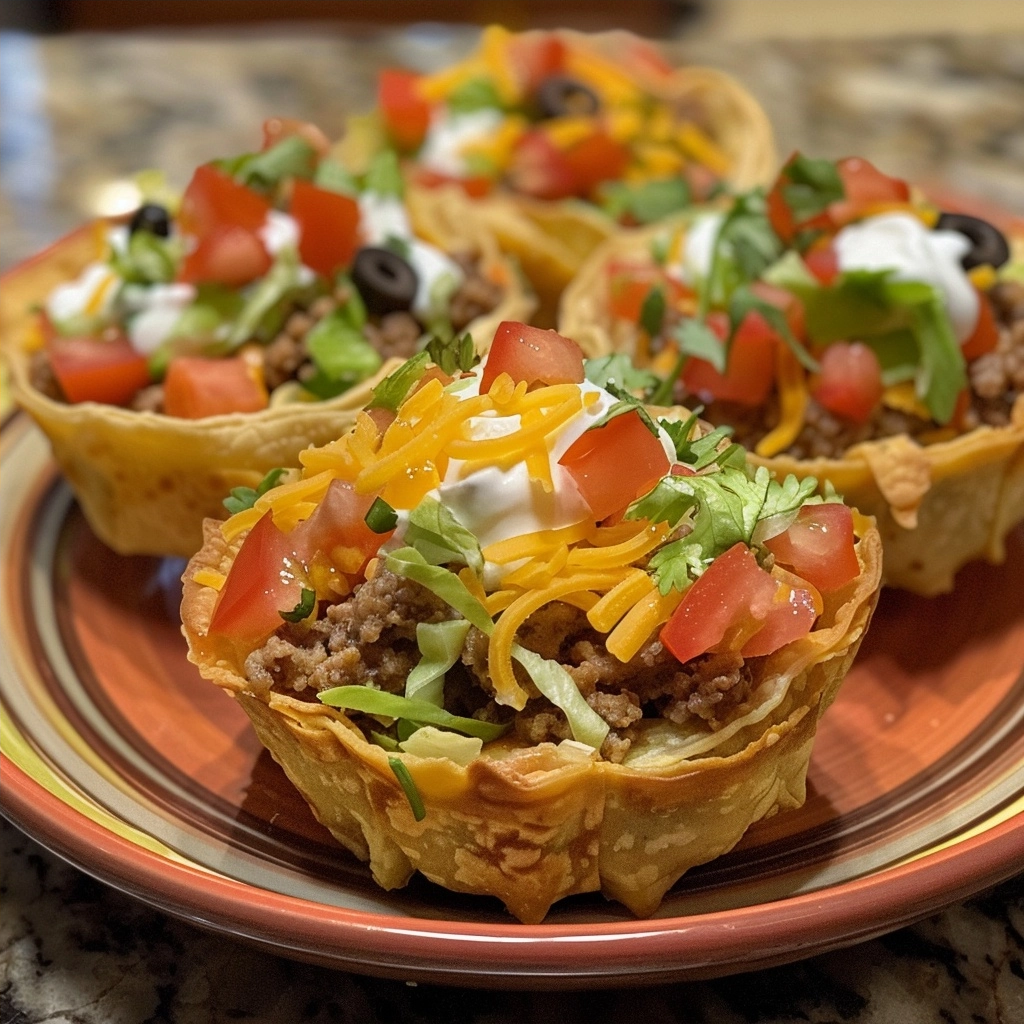
If you love tacos but want to try something fun and unique, TacoCupcakes are the perfect recipe to spice up your mealtime. These delightful handheld treats combine the classic flavors of a taco with the convenience and appeal of a cupcake. Each bite offers a wonderful mix of savory ground beef, melted cheese, and fresh toppings wrapped in crispy wonton shells. You’ll be enchanted by the satisfying crunch, the rich aroma of seasoned beef, and the colorful freshness from the toppings. Whether you’re serving these at a family dinner, party, or casual get-together, TacoCupcakes are sure to be a crowd-pleaser.
Prep Time, Cook Time, Total Time, and Servings
To make these tasty TacoCupcakes, you’ll need about 15 minutes to prep. The baking time is short, around 10 to 12 minutes, making the total time roughly 30 minutes from start to finish. This recipe yields 12 TacoCupcakes, perfect for serving a small group or family.
Ingredients
- 1 lb Ground Beef
- 1 Packet Taco Seasoning
- 1/2 Cup Water
- 24 Wonton Wrappers
- 1 Cup Shredded Cheddar Cheese
- 1 Cup Shredded Monterey Jack Cheese
- 1/2 Cup Diced Tomatoes
- 1/2 Cup Shredded Lettuce
- 1/4 Cup Sliced Black Olives
- 1/4 Cup Chopped Green Onions
- Sour Cream, for topping
- Salsa, for topping
Step-by-Step Instructions
- Prepare Your Oven and Muffin Tin: Preheat your oven to 375°F (190°C). Grease a 12-cup muffin tin with cooking spray or a little oil to prevent sticking.
- Cook the Beef: In a skillet over medium heat, brown 1 lb of ground beef until fully cooked, breaking it apart as it cooks. Once browned, drain any excess fat carefully to keep the dish lean.
- Add Seasoning and Simmer: Stir in 1 packet of taco seasoning and 1/2 cup water to the browned beef. Reduce the heat and simmer the mixture, stirring occasionally, until it thickens and absorbs the seasoning—around 5 minutes.
- Assemble the TacoCupcakes – Layer One: Place one wonton wrapper into each muffin cup, pressing gently to form a cup shape. Add a generous spoonful of the seasoned beef into each wonton cup. Sprinkle a mix of shredded cheddar and Monterey Jack cheese (about two tablespoons each) over the beef in every cup.
- Layer and Bake: Top each cheesy beef cup with another wonton wrapper, then add another layer of beef and cheese for a delicious double-stacked effect. Bake in the oven for 10-12 minutes, or until the wonton wrappers are golden and the cheese is melted and bubbly.
- Cool and Add Fresh Toppings: Remove the TacoCupcakes from the oven and allow them to cool slightly for about 5 minutes. Then top each with diced tomatoes, shredded lettuce, sliced black olives, chopped green onions, a dollop of sour cream, and a spoonful of salsa to add fresh brightness and creaminess.
- Serve and Enjoy: Serve your TacoCupcakes warm for the best flavor and texture. These are perfect as an appetizer, snack, or main dish with a side salad.
Pro Tips for Perfect TacoCupcakes
- Use Fresh Wonton Wrappers: Fresh wonton wrappers crisp up nicely and hold their shape better than frozen ones.
- Drain the Beef Well: Removing excess grease from the ground beef prevents soggy TacoCupcakes.
- Layer Cheese Well: Mixing cheddar and Monterey Jack cheese enhances flavor and meltiness.
- Don’t Overfill: Add just enough filling to avoid overflowing and keep the cupcakes tidy.
- Let Them Cool Slightly: Cooling prevents the toppings like sour cream and salsa from melting or sliding off.
Variations and Substitutions
You can easily customize this recipe to suit different tastes and dietary needs. For a healthier option, use lean ground turkey or chicken instead of beef. To make it vegetarian, substitute the meat with seasoned black beans or lentils. Swap out wonton wrappers for small tortilla rounds if you prefer a softer outer layer, or try using whole wheat wonton wrappers for added fiber. Add more veggies like bell peppers, corn, or jalapeños to the meat mixture for extra color and nutrients. For a dairy-free twist, use vegan cheese and dairy-free sour cream alternatives. Remember, these substitutions maintain the spirit of TacoCupcakes while respecting dietary restrictions and preferences.
Storage and Reheating Tips
Leftover TacoCupcakes can be stored in an airtight container in the refrigerator for up to 3 days. To reheat, place them on a baking sheet and warm in a preheated 350°F (175°C) oven for about 8-10 minutes or until heated through and crisp again. Avoid microwaving as it can make the wonton wrappers soggy. If you want to freeze, wrap each TacoCupcake individually in plastic wrap and place them in a freezer-safe bag for up to one month. Reheat from frozen by baking at 350°F (175°C) for 15-18 minutes until hot.
Frequently Asked Questions (FAQ)
- Can I make TacoCupcakes ahead of time?
- Yes, you can prepare the filling and assemble them a few hours before baking. Just keep the assembled uncooked cupcakes covered in the fridge and bake just before serving.
- What can I use instead of wonton wrappers?
- If you can’t find wonton wrappers, small tortilla rounds or even phyllo dough sheets work well as an alternative.
- Are TacoCupcakes gluten-free?
- Traditional wonton wrappers contain wheat, so this recipe is not gluten-free. Use gluten-free wonton wrappers or substitute with gluten-free tortillas to accommodate gluten-sensitive diets.
- Can I add more toppings?
- Absolutely! Feel free to customize with avocado slices, jalapeños, cilantro, or whatever fresh ingredients you enjoy.
- How spicy are these TacoCupcakes?
- The spice level depends on the taco seasoning you use. Choose mild for a family-friendly flavor or hot seasoning if you like a bit of heat.
Nutrition Estimate per Serving
Each TacoCupcake provides roughly 250 calories, with approximately 15 grams of protein, 15 grams of carbohydrates, and 12 grams of fat. The combination of ground beef and cheese offers a satisfying protein and fat content, while veggies add fiber and essential nutrients. This treat makes for a balanced snack or light meal when paired with a side of fresh salad or veggies.