

Introduction
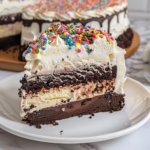
If you’ve ever savored the sweet, creamy experience of a Dairy Queen Ice Cream Cake, you know it’s a perfect blend of rich flavors, delightful textures, and nostalgic aroma. This beloved dessert combines layers of smooth chocolate and vanilla bean ice cream with crunchy chocolate cookie crumbs, luscious hot fudge, and fluffy whipped cream frosting. The balance between cold, creamy ice cream and the slight crunch from the cookie crust creates a treat that’s exciting to eat and easy to love. Plus, you can make this iconic Dairy Queen Ice Cream Cake right in your kitchen using simple ingredients and easy steps. Whether you’re planning a birthday celebration or just craving a cool indulgence, this recipe will bring joy to your dessert table.
Grab your mixing bowl and get ready to dive into this homemade version of the classic Dairy Queen Ice Cream Cake!
Prep Time, Cook Time, and Servings
The prep time for this cake is about 30 minutes, including softening the ice cream and preparing the cookie layer. Baking the cookie crumbs takes 7 to 8 minutes, and freezing stages add several hours, making the total time approximately 6-7 hours or overnight. This recipe makes 8 generous servings, perfect for a family gathering or special occasion.
Ingredients
- Ice Cream Cake Layers:
- 1 to 1½ quarts chocolate ice cream
- 1 to 1½ quarts vanilla bean ice cream
- Cookie Crunch Layer:
- 20 crushed chocolate sandwich cookies (with cream center)
- 4 tablespoons salted sweet cream butter (melted)
- Hot Fudge Layer:
- 11.75 ounce jar hot fudge topping
- Whipped Cream Frosting:
- 2 cups cold heavy cream
- 1¼ cup powdered sugar
- 1½ teaspoons clear vanilla flavoring
- Colorful sprinkles (optional garnish)
Step-by-Step Instructions
- Prepare the pan and oven: Line a 9-inch springform pan with plastic wrap. Preheat the oven to 350°F (175°C). Line a 10×15 inch baking sheet with parchment paper.
- Create the cookie crunch layer: In a small mixing bowl, combine the crushed chocolate sandwich cookies with the melted butter. Stir until all crumbs are coated evenly.
- Bake the cookie crumbs: Spread the cookie and butter mixture evenly onto the lined baking sheet. Bake for 7-8 minutes until slightly crisp. Remove from the oven and cool completely.
- Prepare the chocolate ice cream layer: Take the chocolate ice cream out of the freezer and allow it to soften for 15-20 minutes. Once softened, spread it evenly into the prepared springform pan. Return to the freezer for 1 hour to firm up.
- Add the hot fudge and cookie layers: Warm the hot fudge topping in the microwave for 20-25 seconds to soften it slightly. Spread the hot fudge evenly over the chocolate ice cream. Next, sprinkle the cooled baked cookie crumbs on top. Gently press down so the cookie crumbs form a solid layer. Freeze again for 1 hour.
- Spread the vanilla ice cream layer: Remove the vanilla bean ice cream from the freezer about 15-20 minutes before spreading. Once softened, spread the vanilla ice cream evenly over the cookie crunch layer. Freeze for 4-6 hours or overnight for best results.
- Prepare the whipped cream frosting: Place a mixing bowl in the freezer for 30 minutes to chill. Pour the cold heavy cream into the chilled bowl along with the powdered sugar and clear vanilla flavoring. Beat on high speed with an electric mixer for 3-4 minutes until stiff peaks form.
- Assemble and frost the cake: Scoop 1 cup of the whipped cream into a piping bag for decorating. Remove the ice cream cake from the freezer. Carefully remove the springform pan edges and the plastic wrap. Quickly frost the sides and top of the cake with the remaining whipped cream. Pipe a decorative shell or swirl pattern around the edges. Garnish with colorful sprinkles if desired. Return the cake to the freezer until serving.
Pro Tips for Perfect Results
- Softening ice cream: Don’t let your ice cream get too soft; 15-20 minutes at room temperature is ideal to make spreading easy without melting.
- Crushing cookies: Use a food processor for even cookie crumbs or place them in a ziplock bag and crush with a rolling pin for best texture.
- Baking cookie crumbs: Bake crumbs just until slightly crispy, or they might become too hard when frozen in the cake.
- Chilling bowl for whipped cream: Chill the mixing bowl and beaters to ensure the cream whips up fluffy and light.
- Freezing time: Don’t rush freezing between layers; letting each layer firm up prevents mixing and keeps the distinct layers intact.
Variations and Substitutions
This Dairy Queen Ice Cream Cake recipe is easy to customize based on preferences or dietary needs.
- Healthier swaps: Use light sweetened whipped topping or coconut whipped cream for a lower-fat or dairy-free option.
- Ice Cream alternatives: Swap vanilla bean for strawberry or caramel ice cream to switch up the flavor profile.
- Cookie crunch alternatives: Try crushed graham crackers or gluten-free sandwich cookies for a different crunch or to suit dietary restrictions.
- Fudge layer: Substitute hot fudge with homemade chocolate ganache made with dark chocolate and cream for a fresher taste.
- Adding nuts: For extra texture, sprinkle chopped toasted nuts like almonds or pecans on the cookie layer (optional).
Storage and Reheating Tips
Store your Dairy Queen Ice Cream Cake tightly covered in plastic wrap or an airtight container to avoid freezer burn and ice crystal formation. Keep it in the freezer and consume within 2 weeks for best taste and texture. Since this cake is frozen, reheating is not recommended. Instead, let it sit at room temperature for 10-15 minutes before slicing to make cutting easier and maintain its creamy texture.
FAQ
- Can I use a different size pan? Yes, but adjust the ice cream quantity accordingly. A 9-inch springform pan is ideal for this recipe.
- How do I prevent the cake from becoming too hard? Allow the cake to thaw slightly (10-15 minutes) before serving for the best texture.
- Can I prepare this cake a day ahead? Absolutely! In fact, freezing it overnight enhances the flavor melding and firmness.
- Is it possible to make it dairy-free? Yes, substitute dairy ice creams and cream with plant-based alternatives and ensure cookies are vegan.
- What if I don’t have a springform pan? You can line a regular cake pan with plastic wrap and carefully invert the cake after freezing to remove it.
Nutrition Estimate per Serving
Each serving of this luscious Dairy Queen Ice Cream Cake provides approximately 350-400 calories. It contains around 5 grams of protein, 45 grams of carbohydrates, and 18 grams of fat. The cake is indulgent, thanks to its rich ice cream and creamy frosting layers, so it’s best enjoyed as an occasional treat.
Dairy Queen Ice Cream Cake Recipe: A Creamy Delight You Can Make at Home
This homemade version of a Dairy Queen Ice Cream Cake features layers of chocolate and vanilla bean ice cream, a crunchy chocolate cookie crunch layer, sweet hot fudge, and fluffy whipped cream topping. An indulgent and nostalgic treat perfect for any celebration.
- 1 to 1½ quarts chocolate ice cream
- 1 to 1½ quarts vanilla bean ice cream
- 20 crushed chocolate sandwich cookies (with cream center)
- 4 tablespoons salted sweet cream butter (melted)
- 11.75 ounce jar hot fudge topping
- 2 cups cold heavy cream
- 1¼ cups powdered sugar
- 1½ teaspoons clear vanilla flavoring
- Colorful sprinkles (optional garnish)
-
Line a 9-inch springform pan with plastic wrap. Preheat oven to 350°F (175°C). Line a 10×15 inch baking sheet with parchment paper.
-
In a small mixing bowl, combine the crushed chocolate sandwich cookies with the melted butter. Stir until all crumbs are coated evenly.
-
Spread the cookie and butter mixture evenly onto the lined baking sheet. Bake for 7-8 minutes until slightly crisp. Remove from the oven and cool completely.
-
Take the chocolate ice cream out of the freezer and allow it to soften for 15-20 minutes. Once softened, spread it evenly into the prepared springform pan. Return to the freezer for 1 hour to firm up.
-
Spread the cooled cookie crunch layer evenly on top of the chocolate ice cream layer.
-
Pour the hot fudge topping evenly over the cookie layer and spread it in an even layer. Return to the freezer for 1 hour to firm up.
-
In a large mixing bowl, whip the cold heavy cream, powdered sugar, and vanilla flavoring until soft peaks form. Spoon the whipped cream on top of the fudge layer and spread into a smooth layer.
-
Freeze the cake for at least 4 hours before unmolding.
-
Once firm, carefully remove the plastic wrap from the cake. Transfer the cake to a serving platter. Garnish with sprinkles if desired. Slice and serve.
Ensure the hot fudge topping is store-bought or homemade with no alcohol.
For a non-dairy option, use vegan ice cream and non-dairy whipped cream.
Allow the cake to sit at room temperature for 5-10 minutes before cutting for easier slicing.
Store in the freezer in an airtight container for up to 2 weeks.