
Introducing Cheeseburger Stuffed Tater Tot Cones: A Flavor Explosion
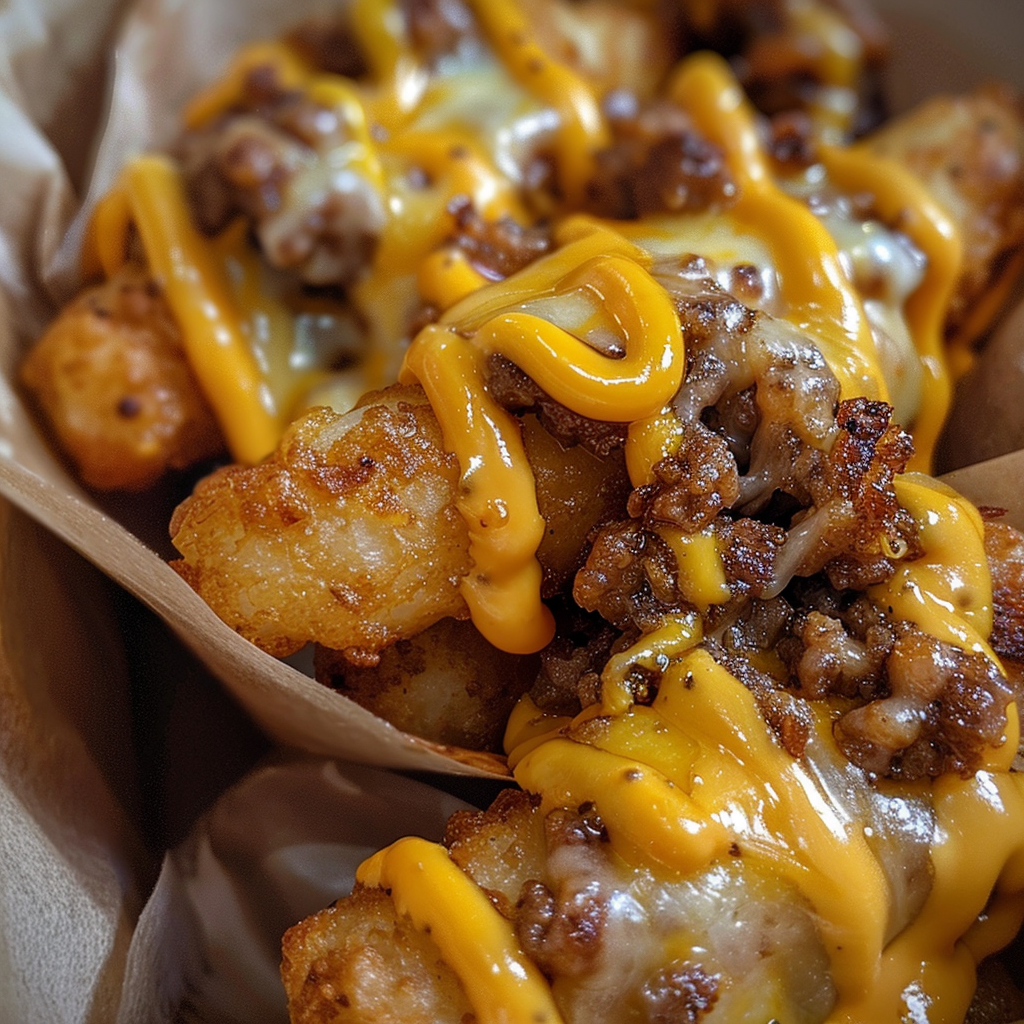
If you love the perfect blend of crispy, cheesy, and savory flavors, our Cheeseburger Stuffed Tater Tot Cones will quickly become a family favorite. Imagine golden, crunchy tater tots molded into a cone shape, filled with seasoned ground beef, melty cheddar cheese, and topped with crispy crumbled bacon. The aroma alone is enough to make your mouth water! The combination of textures—from the crunchy exterior to the gooey, cheesy center and zesty condiments—creates a truly irresistible bite. Whether you’re craving a fun appetizer or a crowd-pleasing snack, these cones bring all the flavors of a cheeseburger in an inventive and delicious package.
Prep & Cook Time and Servings
Preparing and cooking these Cheeseburger Stuffed Tater Tot Cones takes just about 45 minutes from start to finish. The prep time is approximately 10 minutes, as you’ll spend a few moments thawing and arranging your tater tots. Baking and assembly take around 35 minutes. This recipe yields 12 tasty cones—perfect for sharing at parties or enjoying as a hearty snack.
Ingredients
- 4 cups frozen tater tots
- 1 lb ground beef
- 6 slices bacon, cooked and crumbled (use halal bacon or turkey bacon as a substitute)
- 1 cup shredded cheddar cheese
- 1/4 cup ketchup
- 2 tablespoons mustard
- 1/4 cup diced pickles (optional)
- Salt and pepper to taste
Step-by-Step Instructions
- Preheat the oven and grease muffin tin: Begin by setting your oven to 425°F (220°C). Lightly grease a 12-cup muffin tin to prevent sticking.
- Partially bake tater tots: Place frozen tater tots evenly into each muffin cup. Bake for 10-15 minutes until they begin to soften but are not yet crispy.
- Create the cone shape: Remove the muffin tin from the oven and use the back of a spoon to gently press the tater tots down and up the sides of each cup, forming a tater tot cone.
- Bake again until golden: Return the muffin tin to the oven and bake for another 10-15 minutes, or until the tater tot cones become golden brown and crispy.
- Cook and season the ground beef: While the cones bake, heat a skillet over medium heat. Add the ground beef, season with salt and pepper, and cook until no longer pink. Drain excess grease from the pan.
- Mix in ketchup and mustard: Stir the ketchup and mustard into the cooked beef until evenly combined, creating a flavorful burger-style filling.
- Fill the tater tot cones: Spoon the beef mixture evenly into each crispy tater tot cone.
- Add cheese and bacon: Top each cone with shredded cheddar cheese and crumbled bacon (or your chosen substitute).
- Melt the cheese: Place the filled cones back in the oven and bake for 5-7 minutes, until the cheese has melted to perfection.
- Finish and serve: Remove from the oven and allow to cool slightly. Add diced pickles on top if desired. Serve warm with extra ketchup and mustard for dipping.
Pro Tips for Perfect Cheeseburger Tater Tot Cones
- Choose quality ground beef: Use fresh, lean ground beef (around 85% lean) for the best flavor and less grease.
- Don’t skip greasing your muffin tin: This prevents the cones from sticking and helps them maintain their shape when removing.
- Press tater tots gently: Be careful when forming cones so you don’t break the structure—firmly but gently work the tots into shape.
- Add cheese last: Melting cheese on top last prevents it from burning and keeps it ooey-gooey.
- Customize toppings: Feel free to add diced onions, jalapeños, or shredded lettuce after baking for extra flavor and texture.
Variations and Substitutions
You can easily adapt this recipe to suit various tastes and dietary needs:
- Meat substitutes: Use ground turkey, chicken, or plant-based meat alternatives for a leaner or vegetarian-friendly option.
- Cheese options: Swap cheddar for mozzarella, pepper jack, or vegan cheese to tweak the flavor.
- Bacon alternatives: Replace traditional bacon with halal turkey bacon, beef bacon, or omit completely for a vegetarian version.
- Healthier swaps: Opt for baked tater tots with less oil, use low-fat cheese, or add extra veggies to the beef mixture to increase nutrition.
- Spice it up: Add Worcestershire sauce, garlic powder, or smoked paprika to the beef for a deeper flavor profile.
Storage and Reheating Tips
Store leftover cones in an airtight container in the refrigerator for up to 3 days. To reheat, place the cones on a baking sheet and warm in a 350°F oven for about 10 minutes, or until heated through and the cheese is melty again. Avoid microwaving if possible, as this can make the tater tots lose their crispiness. You can also freeze unfilled, baked tater tot cones for up to a month. Thaw in the fridge overnight, then fill and bake as directed.
Frequently Asked Questions (FAQ)
- Can I use fresh potatoes instead of frozen tater tots?
- Yes, but it requires more prep. You’ll need to grate and partially cook the potatoes before shaping them in the muffin tin. Frozen tater tots provide convenience and consistent texture.
- Is there a substitute for mustard in the beef mixture?
- If you’re not a fan of mustard, you can replace it with a teaspoon of mayonnaise or a splash of Worcestershire sauce to keep the tangy flavor.
- How do I prevent soggy tater tot cones?
- Make sure to bake the cones until crisp and golden before filling. Also, drain any excess grease from the beef and avoid adding watery toppings before serving.
- Can I make these cones ahead of time?
- You can prepare and bake the empty tater tot cones ahead and store them in the fridge. Fill and bake just before serving for the freshest results.
- Are these cones kid-friendly?
- Absolutely! They’re a fun, handheld twist on cheeseburgers that kids typically love, especially with ketchup and mustard on the side.
Nutrition Estimate per Serving
Each serving (1 cone) contains approximately 320 calories, with 18 grams of protein, 20 grams of carbohydrates, and 18 grams of fat. The protein comes primarily from the ground beef and bacon, while the carbs are mainly from the tater tots. This recipe offers a balanced combination of macronutrients perfect for a satisfying snack or meal.
Ready to wow your family and friends? These Cheeseburger Stuffed Tater Tot Cones combine the best parts of a classic cheeseburger with crispy, comforting tater tots. They’re easy to make, customizable, and guaranteed to become a go-to recipe for any occasion.
Cheeseburger Stuffed Tater Tot Cones

Crispy tater tot cones filled with seasoned ground beef, melty cheddar, and bacon, topped with tangy ketchup and mustard. A handheld version of a classic cheeseburger with bold flavor and texture contrast.
- 4 cups frozen tater tots
- 1 lb ground beef
- 6 slices turkey bacon or halal bacon, cooked and crumbled
- 1 cup shredded cheddar cheese
- 1/4 cup ketchup
- 2 tablespoons mustard
- 1/4 cup diced pickles (optional)
- Salt and pepper to taste
-
Preheat oven and grease muffin tin: Set oven to 425°F (220°C). Lightly grease a 12-cup muffin tin.
-
Partially bake tater tots: Place frozen tater tots evenly into each muffin cup. Bake for 10-15 minutes until softened.
-
Create the cone shape: Remove tin and press tater tots into a cone shape against the sides of each cup.
-
Bake again: Return to oven and bake 10-15 minutes until golden and crispy.
-
Cook ground beef: In a skillet, cook ground beef with salt and pepper until browned. Drain excess fat.
-
Add ketchup and mustard: Stir in ketchup and mustard to create a filling.
-
Fill cones: Spoon beef mixture into each tater tot cone. Top with cheese and bacon.
-
Final bake (optional): Bake 2-3 minutes until cheese is melted and bubbly.
Use turkey bacon or halal alternatives for dietary restrictions
Add pickles if using
Serve immediately for optimal crispiness
Can be lightly greased with non-dairy oil for extra browning